Online Documentation Server
 ПОИСК
ods.com.ua Web
 КАТЕГОРИИ
Home
Programming
Net technology
Unixes
Security
RFC, HOWTO
Web technology
Data bases
Other docs


 ПОДПИСКА

 О КОПИРАЙТАХ
Вся предоставленная на этом сервере информация собрана нами из разных источников. Если Вам кажется, что публикация каких-то документов нарушает чьи-либо авторские права, сообщите нам об этом.


Chapter 21

Building VRML Models with Perl


CONTENTS


The Virtual Reality Modeling Language (VRML) is a relatively new language to surface on the Internet. The object-oriented features of Perl can be used with the three-dimensional object definitions of VRML to allow you as a user to produce relatively complex models in 3D space. This chapter introduces you to a Perl package called VRML.pm that generates VRML-coded text based on Perl scripts.

What Is VRML?

VRML is a language developed from the collective minds of a lot of Internet users. VRML enables you to define and lay out three-dimensional objects that can be viewed using a virtual program. VRML is often referred to as the virtual reality equivalent of HTML. It is becoming the de facto language on the Internet and World Wide Web for defining 3D objects. VRML is supported by many commercial vendors as the language to use in their software and hardware.

Using VRML, you can describe virtual worlds. Components of these virtual worlds can be interconnected using the World Wide Web just as in HTML. All transactions in HTML involve getting a document into a browser and then viewing the document as a static entity. VRML extends this viewing capability by allowing a user to "walk through" a virtual world and thus provides more functionality for user interaction.

The VRML 1.0 specification was the result of three individuals: Mark Pesce, Anthony Parisi, and Gavin Bell. The VRML 2.0 specification is still in the works; therefore, this chapter deals only with the 1.0 specification.

Information on VRML 2.0 can be found on the Web site http://www.sd.tgs.com/VRML/vrml2.htm. The letters tgs stand for Template Graphics Software.

Why Write VRML.pm?

The VRML specification was in a state of flux at the time this book was written. This volatility somehow justifies the use of Perl to generate VRML code for worlds. If the changes to the VRML specification drastically affect my VRML code, all I do is change the VRML.pm module file and rerun my scripts to generate new, up-to-date 3D worlds in the modified VRML specification.

Added to this reason for using Perl is the strict type checking and object-oriented features of Perl. Using Perl objects as building blocks, complex images and worlds can be created to represent results in a 3D environment.

The real reason is that I wanted to see whether it could be done. That is, can we use Perl's object-oriented features to manage 3D objects in VRML? The answer is yes! There should be an asterisk next to the "yes," though. The advantage gained in managing VRML objects can be offset by the fact that a program, no matter how well written, cannot crank out better VRML code than a human being. Using this module I can set up and create simple worlds; however, the code produced by the scripts can be optimized or shortened considerably manually. The changes you make manually will be overwritten the next time you run your program unless you save them. In short, although it's possible to generate VRML worlds from within Perl scripts, you might want to consider at least looking at the output to see whether you can improve it to reduce the size of the listings.

Also, before you get too deep into using Perl for generating objects and VRML files, ask yourself this question: Do I need the object-oriented features here? If your script is simply creating a model world and you are supplying all the coordinates manually, you should really consider buying a 3D modeling package. Of course, there might be a wide variety of such programs available for your needs. More and more tools are becoming available for VRML worlds as this book goes to print. In my humble opinion, you should consider looking at other VRML tools before you embark on writing your own in Perl. A shareware or commercial application might just do exactly what you need!

Also, if your Perl script is generating data that you want to view visually in three dimensions, then you should consider using this package. Some common uses for this package are creating chemical models, accumulative distribution of particles on a non-uniform surface, and contour seismic data.

Where to Get More Information on VRML

Your first choice is to use the WebCrawler or InfoSeek search results on VRML. The information from the online searches will be far more current than any printed matter. Here are some sites that have stood the test of time:

In addition to the resources on the Net, there are several texts on the market. Some of the texts that deal with VRML and 3D graphics are listed at http://wwwiz.com/books. There are books here on HTML, VRML, Java, and related topics. Select the Subjects link to get a list of all the titles. Be sure to consult these books to get more information on the details of 3D graphics and how to work with VRML.

Free worlds can be found at ftp://www.vrml.org/pub/graphics. The artwork is free but copyrighted, so be sure to look for disclaimers.

Basics of VRML

A VRML file simply defines all the objects required to generate a 3D virtual world. Objects within this file are also referred to as nodes. Each object knows the type of object it is, has fields in it to identify its properties, possibly has a name, and may have children. Sound like Perl yet?

All VRML files are written in ASCII and have the first line of the file in this form:

#VRML V1.0 ascii

Generally, the VRML files have a .WRL extension, but this is not necessary. Some viewers may require the use of .WRL as the default extension.

Comments are possible with #, as with the Perl or shell scripts. Strings can be within quotes. Numbers can be grouped together within square brackets or can be listed with white space between them. Numbers in VRML files are floating point with few exceptions. Bitmapped flags are possible, and so are Boolean variables.

The VRML specification lists numbers with an SF prefix or an MF prefix when defining types of variables. The SF stands for single field; that is, the variable being referred to has only one field in it. An example is SFLong for a long integer and SFMatrix for a transformation matrix. Note that even though SFMatrix contains 16 values, these values are all part of one field. The MF prefix stands for multiple-value fields. An example of an MF field is a vector.

Vectors and matrices are supported in VRML. Both two-dimensional (SFVec2f) and three-dimensional (SFvec3f) vectors are supported. Matrices are stored in a row major format.

Coordinates for objects are given in an XYZ format. All objects are created at the origin 0 0 0, unless otherwise specified at the time of creation. You apply transformations to the objects to move them to the desired location in the 3D space you are creating.

Colors are specified in RGB format, where floating numbers are given as 0.0 for darkest and 1.0 for brightest. Thus, 000 is black, 001 is blue, and 111 is white. The brightness in each color component is scaled from 0.0 to 1.0 in a linear fashion. There are two ways to define colors. For a gray scale image (where the R:G:B ratios are the same), use the SFColor type to use only one field for R, G, and B. For other colors, you have to use the MFColor type to define different ratios for R:G:B.

You construct models based on types of objects by placing them in the virtual world at different coordinates. The transformations to place these objects in the world are of three basic types: scaling to get the right size, translation to move from one location to another, and a rotation of some degrees about a point of origin.

Each object also has features such as color, texture, shininess, and so on. These features are unique to the type of an object. Object definitions can be made into a template of sorts to create several objects of the same type and features.

There are several types of shapes that an object can take. The full list supported in version 1.0 of VRML is shown here:

  • Cube (supported by VRML.pm)
  • Cone (supported by VRML.pm)
  • Cylinder (supported by VRML.pm)
  • Sphere (supported by VRML.pm)
  • PointSet (for multiple points)
  • IndexedLineSet (for multiple vectors)
  • IndexedFaceSet (for multiple surfaces)
  • AsciiText (for annotation)

Note
The VRML.pm module does not include support for generating all these types. As soon as this book goes to print, I will add the code to support these items. Stay tuned to the README.VRML file at ikra.com/pub/perl5/modules directory for latest updates.

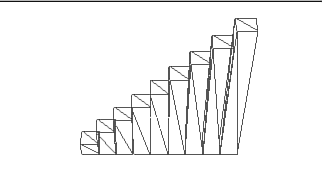
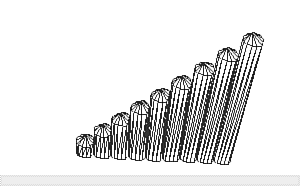
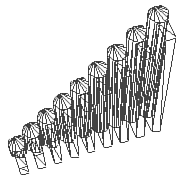
There is one important type of node that you should know about before we continue. This node is called the separator node. Basically, a separator node creates a new traversal tree for all following nodes. A traversal tree is simply a tree structure with nodes that are traversed by a VRML when rendering the image. Each leaf in the tree is a VRML object or the start of a new subtree with a separator node. It's generally very easy to group nodes together in a separator node, apply all translations (and so on) to these nodes, and then close the separator node to proceed with what you were doing earlier. With the help of several separator nodes, you can define different objects with different types of properties.

The group node offers limited functionality of the separator node and is not supported by VRML.pm.

The concept behind creating objects of a given type are simple. Let's look at a simple example of a VRML script. The script shown in Listing 21.1 is the output from a Perl script using the VRML.pm package. I will discuss the Perl script later in this chapter. For now, just look at the VRML script. Note that the line numbers are added for reference.


Listing 21.1. The sample VRML file.
 1 #VRML V1.0 ascii
 2 #
 3 # Created by VRML.pm
 4 #
 5 Separator {
 6 Separator {
 7 Material {
 8 ambientColor .1 .1 .1
 9 # End Material
10 Transform {
11 } # End Transform
12 Cube {
13 width .8
14 height .8
15 depth .8
16 }
17 } # End Separator
18 Separator {
19 Material {
20 ambientColor .1 1 1
21 } # End Material
22 Transform {
23 translation 0 0 .4
24 } # End Transform
25 Cube {
26 width .8
27 height .1
28 depth .8
29 }
30 } # End Separator
31 Separator {
32 Material {
33 diffuseColor .1 .1 .1
34 } # End Material
35 Transform {
36 translation 0 0 .5
37 } # End Transform
38 Cube {
39 width .8
40 height .1
41 depth .8
42 }
43 } # End Separator
44 } # End Separator

Lines 1 through 4 are comments generated from the VRML.pm module. In line 5, we define a separator which will contain the object just about to be defined in our virtual world. The ambient color for this object is defined in lines 6 through 9. More color, luminance, and reflectivity definitions could be defined in the Materials section. No transformation to move the object is applied in lines 10 and 11; however, the section is defined so that you can manually edit it. Lines 12 through 16 define the dimensions of a cube. The dimensions are given in a normalized coordinate scheme, i.e. ranging from 0 to 1. (To use a different reference for the size, you would have to apply a scaling transformation.) Line 17 ends the definition of this cube.

The process of defining the material type, transformation, and object type of two more objects are repeated in lines 18-30 and 31-42. The process is repetitive: start a separator, define its type of material, apply a transformation to move, scale, or rotate it, and then define its normalized dimensions.

The separator we opened in line 5 was terminated at line 43. This completes the definition of all the objects in our little world.

The code required to generate the VRML script is shown in Listing 21.2.

Admittedly, the number of lines in the Perl script are about the same as the number in the VRML script. As your models become more and more complex, this ratio should change to very few lines of Perl code per 100 lines of definitions in the VRML output.


Listing 21.2. The code to generate two cubes.
 1 #!/usr/bin/perl
 2 use VRML;
 3 use VRML::Cube;
 4 my $header = VRML::new();
 5 $header->VRML::startHeader;
 6 $header->VRML::startSeparator;
 7 my $cubeb = $header->VRML::putCube(
 8           'width' => 0.5, 'height' => 0.5 , 'depth' => 0.5 ,
 9           'translation' => [1,0,0]
10           );
11 my $cubed = $header->VRML::putCube(
12           'width' => 1, 'height' => 1 , 'depth' => 1 ,
13           'translation' => [1,1,0],
14           );
15 $header->VRML::stopSeparator;

Let's look at the code shown in Listing 21.2. Lines 2 and 3 indicate that the VRML package and the Cube object are being used. Line 4 creates the VRML object, which will (eventually) contain all the definitions for the objects. Line 5 starts the required header for all VRML output.

Line 6 starts a separator node, which will house all the current changes. In Lines 7 through 9, we create one cube by giving its width, height, and depth. The cube is placed at coordinates [1,0,0]. A second cube is placed at [1,1,0], via code in lines 11-14. All changes to the current separator node are ended at line 15. At this point, the script could start a completely different separator.

It would be a good idea to examine the code in Listing 21.2 with the VRML output generated in Listing 21.1. By looking at how each line of Perl code generates each section of VRML, you should be able to see how to apply the VRML.pm module for your own programs.

Building the VRML Perl Module

The VRML module is composed of several components. The main component is the VRML.pm file, and the rest of the components are shape object creators in the VRML directory. The VRML.pm file is located in the PERLLIBDIR directory (/usr/lib/perl5), and the shape creation files are located in the ${PERLLIBDIR}/VRML subdirectory. There are no extension files to worry about just yet.

Where to Get the Source for the Perl to VRML Package

The source of the Perl to VRML package is still in beta and resides at the ftp location ftp://ikra.com/pub/perl5/modules. No warranty of any sort applies in any terms whatsoever. You may copy, modify, and even use the contents of the package in commercial applications just as long as you credit me as the author and keep a note about there being absolutely no warranty. The same disclaimer and warranty for Perl is used for VRML.pm.

Currently, only the following shape nodes are supported: Cube, Cone, Cylinder, and Sphere. All color, transform, PerspectiveCamera, and Material nodes are supported for shapes. As time progresses and the need arises, I will add more node definitions to this package. For comments, updates, and patches, please send me e-mail directly at khusain@ikra.com. If you have a better way of rewriting this module and would like to contribute, please let me know.

Using VRML.pm

You have already seen a use of the VRML package in placing two cubes in a 3D world. That's nice, but not very useful. Why not use the power of Perl to do your expression for you? Look at Listing 21.3, which illustrates how to generate a staircase of values to show in 3D.


Listing 21.3. Using VRML.pm to represent 3D data.
 1 #!/usr/bin/perl
 2
 3 use VRML;
 4 use VRML::Cube;
 5
 6 my $header = VRML::new();
 7 $header->VRML::startHeader;
 8
 9 $header->VRML::startSeparator;
10
11 $header->VRML::setPointLight('location' => [1,1,1],
12                         'color' => [0.2, 0.2, 0.5]);
13
14 $width = 0.1;
15 my @cubeb;
16
17 for ($i= 0; $i< 9; $i++) {
18             $j = $width / 2 + $i * $width;
19             $ht = $i * 0.1 + 0.1;
20             $cubeb[$i] = $header->VRML::putCube(
21                         'width' => $width, 'height' => $ht , 'depth' => 0.1 ,
22                         'translation' => [$j,$ht/2,0],
23                         'ambientColor' => [$i/10, $i/10,$i/10]
24                         );
25             }
26 $header->VRML::stopSeparator;

In Listing 21.3, ten boxes are created to represent data. The height, width, and color of the cubes could be used to represent different features of each box. For the moment, we are stretching the cube to represent the box. The height of the box is a function of a value of an indexed item in an array. Each cube is placed next to each other along the X axis. The output from this script is shown in Listing 21.4.

The point light sets a light source for illuminating the figures. (See Figure 21.1.) Note that I will use only the wireframe model rendering on my VRML viewer to display data because the colors and shading will not allow the models to be reproduced faithfully on paper.

Figure 21.1 : Using boxes to represent data.


Listing 21.4. Using boxes to represent data.
  1 #VRML V1.0 ascii
  2 #
  3 # Created by VRML.pm flag
  4 #
  5
  6  Separator {
  7 PointLight {
  8  location 1 1 1
  9  color .2 .2 .5
 10  } # End PointLight
 11  Separator {
 12  Material {
 13  ambientColor 0 0 0
 14  } # End Material
 15  Transform {
 16  translation .05 .05 0
 17  } # End Transform
 18  Cube {
 19  width .1
 20  height .1
 21  depth .1
 22  }
 23
 24  } # End Separator
 25
 26  Separator {
 27  Material {
 28  ambientColor .1 .1 .1
 29  } # End Material
 30  Transform {
 31  translation .15 .1 0
 32  } # End Transform
 33  Cube {
 34  width .1
 35  height .2
 36  depth .1
 37  }
 38
 39  } # End Separator
 40
 41  Separator {
 42  Material {
 43  ambientColor .2 .2 .2
 44  } # End Material
 45  Transform {
 46  translation .25 .15 0
 47  } # End Transform
 48  Cube {
 49  width .1
 50  height .3
 51  depth .1
 52  }
 53
 54  } # End Separator
 55
 56  Separator {
 57  Material {
 58  ambientColor .3 .3 .3
 59  } # End Material
 60  Transform {
 61  translation .35 .2 0
 62  } # End Transform
 63  Cube {
 64  width .1
 65  height .4
 66  depth .1
 67  }
 68
 69  } # End Separator
 70
 71  Separator {
 72  Material {
 73  ambientColor .4 .4 .4
 74  } # End Material
 75  Transform {
 76  translation .45 .25 0
 77  } # End Transform
 78  Cube {
 79  width .1
 80  height .5
 81  depth .1
 82  }
 83
 84  } # End Separator
 85
 86  Separator {
 87  Material {
 88  ambientColor .5 .5 .5
 89  } # End Material
 90  Transform {
 91  translation .55 .3 0
 92  } # End Transform
 93  Cube {
 94  width .1
 95  height .6
 96  depth .1
 97  }
 98
 99  } # End Separator
100
101  Separator {
102  Material {
103  ambientColor .6 .6 .6
104  } # End Material
105  Transform {
106  translation .65 .35 0
107  } # End Transform
108  Cube {
109  width .1
110  height .7
111  depth .1
112  }
113
114  } # End Separator
115
116  Separator {
117  Material {
118  ambientColor .7 .7 .7
119  } # End Material
120  Transform {
121  translation .75 .4 0
122  } # End Transform
123  Cube {
124  width .1
125  height .8
126  depth .1
127  }
128
129  } # End Separator
130
131  Separator {
132  Material {
133  ambientColor .8 .8 .8
134  } # End Material
135  Transform {
136  translation .85 .45 0
137  } # End Transform
138  Cube {
139  width .1
140  height .9
141  depth .1
142  }
143
144  } # End Separator
145
146  } # End Separator

The script can be modified to use cylinders instead of cubes with a minor adjustment. The modified script to use cylinders is shown in Listing 21.5. Note the use of VRML::Cylinder instead of Cube. Also, note how the parameters to Cylinder are different from Cube, but the calling sequence to put each Cylinder at its location is not very different from the calling sequence used when placing Cubes.

Listing 21.6 presents the output generated by the code in Listing 21.5. Compare Listing 21.6 with Listing 21.4 and notice how the cylinders are translated and created. Figure 21.2 illustrates using cylinders to represent data.

Figure 21.2 : Using cylinders to represent data.


Listing 21.5. Using cylinders instead of cubes to represent data.
 1 #!/usr/bin/perl
 2
 3 use VRML;
 4 use VRML::Cylinder;
 5
 6 my $header = VRML::new();
 7 $header->VRML::startHeader;
 8
 9 $header->VRML::startSeparator;
10
11 $header->VRML::setPointLight('location' => [1,1,1], 'color' => [0.2, 0.2, 0.5]);
12 $width = 0.1;
13 my @cubeb;
14
15 for ($i= 0; $i< 9; $i++) {
16             $j = $width / 2 + $i * $width;
17             $ht = $i * 0.1 + 0.1;
18             $cubeb[$i] = $header->VRML::putCylinder(
19                      'radius' => $width/2, 'height' => $ht , 'parts' => 'ALL',
20                      'translation' => [$j,$ht/2,0],
21                      'ambientColor' => [$i/10, $i/10,$i/10]
22                         );
23             }
24
25 $header->VRML::stopSeparator;


Listing 21.6. VRML output when using cylinders instead of cubes.
  1 #VRML V1.0 ascii
  2 #
  3 # Created by VRML.pm flag
  4 #
  5
  6 Separator {
  7 PointLight {
  8 location 1 1 1
  9 color .2 .2 .5
 10 } # End PointLight
 11 Separator {
 12 Material {
 13 ambientColor 0 0 0
 14 } # End Material
 15 Transform {
 16 translation .05 .05 0
 17 } # End Transform
 18 Cylinder {
 19 parts ALL
 20 radius .05
 21 height .1
 22 }
 23
 24 } # End Separator
 25
 26 Separator {
 27 Material {
 28 ambientColor .1 .1 .1
 29 } # End Material
 30 Transform {
 31 translation .15 .1 0
 32 } # End Transform
 33 Cylinder {
 34 parts ALL
 35 radius .05
 36 height .2
 37 }
 38
 39 } # End Separator
 40
 41 Separator {
 42 Material {
 43 ambientColor .2 .2 .2
 44 } # End Material
 45 Transform {
 46 translation .25 .15 0
 47 } # End Transform
 48 Cylinder {
 49 parts ALL
 50 radius .05
 51 height .3
 52 }
 53
 54 } # End Separator
 55
 56 Separator {
 57 Material {
 58 ambientColor .3 .3 .3
 59 } # End Material
 60 Transform {
 61 translation .35 .2 0
 62 } # End Transform
 63 Cylinder {
 64 parts ALL
 65 radius .05
 66 height .4
 67 }
 68
 69 } # End Separator
 70
 71 Separator {
 72 Material {
 73 ambientColor .4 .4 .4
 74 } # End Material
 75 Transform {
 76 translation .45 .25 0
 77 } # End Transform
 78 Cylinder {
 79 parts ALL
 80 radius .05
 81 height .5
 82 }
 83
 84 } # End Separator
 85
 86 Separator {
 87 Material {
 88 ambientColor .5 .5 .5
 89 } # End Material
 90 Transform {
 91 translation .55 .3 0
 92 } # End Transform
 93 Cylinder {
 94 parts ALL
 95 radius .05
 96 height .6
 97 }
 98
 99 } # End Separator
100
101  Separator {
102  Material {
103  ambientColor .6 .6 .6
104  } # End Material
105  Transform {
106  translation .65 .35 0
107  } # End Transform
108  Cylinder {
109  parts ALL
110  radius .05
111  height .7
112  }
113
114  } # End Separator
115
116  Separator {
117  Material {
118  ambientColor .7 .7 .7
119  } # End Material
120  Transform {
121  translation .75 .4 0
122  } # End Transform
123  Cylinder {
124  parts ALL
125  radius .05
126  height .8
127  }
128
129  } # End Separator
130
131  Separator {
132  Material {
133  ambientColor .8 .8 .8
134  } # End Material
135  Transform {
136  translation .85 .45 0
137  } # End Transform
138  Cylinder {
139  parts ALL
140  radius .05
141  height .9
142  }
143
144  } # End Separator
145
146  } # End Separator

The for loop in Listing 21.5 is a pretty canned approach to generating the test data for this chapter. In most cases, you'll want to generate your data in a function of some sort and then display it. A sample usage of such a function is shown in Listing 21.7.


Listing 21.7. Using a function to get data for display.
 1 #!/usr/bin/perl
 2
 3 use VRML;
 4 use VRML::Cylinder;
 5
 6 sub getResults {
 7             my @answers;
 8             my $i;
 9             for ($i = 0; $i < 9; $i++) {
10                         $answers[$i] = $i;
11             }
12             return (@answers);
13 }
14
15 my $header = VRML::new();
16 $header->VRML::startHeader;
17
18 $header->VRML::startSeparator;
19
20 $header->VRML::setPointLight('location' => [1,1,1], 'color' =>
   Â[0.2, 0.2, 0.5]);
21 $width = 0.1;
22 my @cubeb;
23
24 @results = &getResults();
25
26 foreach $i (@results) {
27             $j = $width / 2 + $i * $width;
28             $ht = $i * 0.1 + 0.1;
29             $cubeb[$i] = $header->VRML::putCylinder(
30                         'radius' => $width/2, 'height' => $ht , 'parts' =>
   Â'ALL',
31                         'translation' => [$j,$ht/2,0],
32                         'ambientColor' => [$i/10, $i/10,$i/10]
33                         );
34             }
35
36 $header->VRML::stopSeparator;

In Listing 21.7, the subroutine getResults is used to generate the data required for display. The getResults subroutine in this example is only doing what the for loop did. However, there is nothing preventing you from replacing the getResults code to access data, for example.

More than one column of data is also possible. Look at Listing 21.8. The output from this run is not listed here but is shown in Figure 21.3.

Figure 21.3 : Using boxes and cylinders to represent data.


Listing 21.8. Using multiple columns.
 1 #!/usr/bin/perl
 2
 3 use VRML;
 4 use VRML::Cube;
 5 use VRML::Cylinder;
 6
 7 sub getResults {
 8             my @answers;
 9             my $i;
10             for ($i = 0; $i < 9; $i++) {
11                         $answers[$i] = $i;
12             }
13             return (@answers);
14 }
15
16 my $header = VRML::new();
17 $header->VRML::startHeader;
18
19 $header->VRML::startSeparator;
20 $width = 0.1;
21 my @cyl;
22
23 @results = &getResults();
24
25 foreach $i (@results) {
26             $j = $width / 2 + $i * $width;
27             $ht = $i * 0.1 + 0.1;
28             $cyl[$i] = $header->VRML::putCylinder(
29                         'radius' => $width/2, 'height' => $ht , 'parts' =>
                           Â'ALL',
30                         'translation' => [$j,$ht/2,0],
31                         'ambientColor' => [$i/10, $i/10,$i/10]
32                         );
33             }
34
35 #
36 # Start second column.
37 #
38 $width = 0.1;
39 my @cub;
40
41 @results = &getResults();
42
43 foreach $i (@results) {
44             $j = $width / 2 + $i * $width;
45             $ht = $i * 0.1 + 0.1;
46             $cub[$i] = $header->VRML::putCube(
47                         'width' => $width/2, 'height' => $ht , 'depth' =>
                           Â$width,
48                         'translation' => [$j,$ht/2,$width],
49                         'ambientColor' => [$i/10, $i/10,$i/10]
50                         );
51             }
52 $header->VRML::stopSeparator;

In the code shown in Listing 21.8, two columns of data are created. Note the use of the Z offset in doing the translation of Cylinders. Also note that only one separator node is used for the entire image and one for each node.

How to View Your World

There are several VRML viewers available on the market today. Some are totally free of charge, some free of charge up to 30 days, and the rest require a fee of anywhere from $50 to thousands of dollars. The following is a list of some of the vendors, their viewers, and what they have to offer. Most of the browsers are for Windows NT or Windows 95, but there are quite a few for UNIX workstations. A few of these are listed here. However, I would advise you to do a search on the Internet for a more comprehensive list. Here's the list:

  • WorldView-A Windows 95, NT, and 3.1 product by InterVista, Inc.
  • NavFlyer-Made by Micro Green, Inc. Requires Win32 if you are running under Windows NT. Also requires the WinG graphics library.
  • WbFX-Runs with Mosaic and the 16-bit version of Netscape only. Made only for Windows 3.1 by Paper Software, Inc.

VRML editors also offer great tools with which you can create your own worlds. Several tools are available for UNIX and Windows NT systems. Most of them let you create these worlds with far more ease than manually edited scripts will. The following tools are available from the commercial sector:

  • Ez3d 2.0 from Radiance Software, 1726 Francisco St., Berkeley, CA 94703. The Ez3d package lets you create VRML 1.0 worlds with an interactive editor. Support for VRML 2.0 is also listed at their Web site at http://www.radiance.com/~radiance.
  • Paragraph home builder by Paragraph International. Their Web site is http://www.paragraph.com. They offer two ways to create worlds: one using their proprietary Home Space environment editor and the other by using a VRML plug-in for Netscape.
  • The San Diego Supercomputing Center (SDSC) offers a set of tools (including source code) for VRML viewers and file creators. Check their web site at http://www.sdsc.edu/EnablingTech/Visualization/vrml.
  • The Virtual World Factory from Aeral systems uses a form-based tool to build VRML worlds. Look at http://www.aereal.com/ for more information.

Inside the VRML.pm Package

Let's take a look at how the VRML.pm library is structured. Part of the main file, VRML.pm, is shown in Listing 21.8. Shape nodes are listed in separate files in the VRML subdirectory. The listing for the Cube.pm file is shown in Listing 21.9. Similar files exist for the Cylinder, Sphere, and Cone shapes. The project is still in its infancy and has to be developed further; however, you have enough here to construct your module and customize it for your needs.


Listing 21.8. The VRML.pm file.
  1 package VRML;
  2
  3 require Exporter;
  4 @ISA = (Exporter);
  5
  6 @EXPORT = qw(new,startHeader,
  7                         startSeparator, stopSeparator,
  8                         defineMaterial, startMaterial, stopMaterial,
  9                         defineTransform, startTransform, stopTransform,
 10                         diffuseColor,
 11                         definePerspectiveCamera,
 12                         setPointLight,
 13                         putCube, putCone, putCylinder);
 14 # ----------------------------------------------------------------
 15 # Internal functions
 16 # ----------------------------------------------------------------
 17 sub makeNode {
 18             my ($this,$name,$value) = @_;
 19             my $j;
 20             print "\n $name {";
 21             foreach $j (@$value) { print " $j";  }
 22             print "} # End $name \n";
 23             }
 24
 25 # ----------------------------------------------------------------
 26 # Exported functions
 27 # ----------------------------------------------------------------
 28 sub new {
 29         my $this = shift;
 30         my $class = ref($this) || $this;
 31         my $self = {};
 32         bless $self, $class;
 33 }
 34
 35 sub startHeader {
 36         my $this = shift;
 37             print "#VRML V1.0 ascii\n";
 38             print "#\n# Created by VRML.pm flag\n#\n";
 39 }
 40
 41 sub startSeparator {
 42             print "\n Separator {";
 43 }
 44
 45 sub stopSeparator {
 46             print "\n } # End Separator \n";
 47 }
 48
 49 #
 50 # The delimiters for Material type.
 51 #
 52
 53 sub defineMaterial {
 54         my $this = shift;
 55             my %parm = @_;
 56             my $key, $value, $j;
 57             print "\n Material {";
 58             while (($key,$value) = each(%parm)) {
 59                         if (($key eq "ambientColor") ||
 60 ($key eq "diffuseColor") ||
 61                        ($key eq "specularColor") ||
 62                        ($key eq "emmissiveColor") ||
 63                        ($key eq "shininess") ||
 64                        ($key eq "transparency")) {
 65                                     print "\n $key";
 66                                     foreach $j (@$value) {print " $j"; }
 67                          } # end of if clause
 68                          } # end of while loop
 69             print "\n} # End Material";
 70 }
 71
 72 sub startMaterial {
 73             print "\n Material {";
 74 }
 75 sub stopMaterial {
 76             print "\n } # End Material \n";
 77 }
 78
 79 #
 80 # Perspective Camera
 81 #
 82 sub definePerspectiveCamera {
 83         my $this = shift;
 84             my %parm = @_;
 85             my $key, $value, $j;
 86             print "\n PerspectiveCamera {";
 87             while (($key,$value) = each(%parm)) {
 88                         if (($key eq "position") ||
 89                                      ($key eq "orientation") ||
 90                                      ($key eq "focalDistance") ||
 91                                      ($key eq "heightAngle")) {
 92
 93                                     print "\n $key";
 94                                     foreach $j (@$value) {print " $j"; }
 95
 96                                     }
 97                          }
 98             print "\n } # End PerspectiveCamera";
 99 }
100
101 #
102 # This subroutine prints out the values for the "transform" node.
103 #
104 sub stopTransform {
105             print "\n } # End Transform";
106 }
107 sub startTransform {
108             print "\n Transform {";
109 }
110 sub defineTransform {
111         my $this = shift;
112             my %parm = @_;
113             my $key, $value, $j;
114             print "\nTransform {";
115             while (($key,$value) = each(%parm)) {
116                         if (($key eq "translation") ||
117                                      ($key eq "rotation") ||
118                                      ($key eq "scaleFactor") ||
119                                      ($key eq "scaleOrientation") ||
120                                      ($key eq "center")) {
121                                     print "\n $key";
122                                     foreach $j (@$value) {print " $j"; }
123                                     }
124                          }
125             print "\n } # End Transform";
126             }
127
128 sub setPointLight {
129         my $this = shift;
130             my %parm = @_;
131             my $key, $value, $j;
132             print "\nPointLight {";
133             while (($key,$value) = each(%parm)) {
134                         if (($key eq "intensity") ||
135                                     ($key eq "on")) {
136                                      print "\n $key $value";
137                         }
138                         if (($key eq "location") ||
139                                      ($key eq "color")) {
140                                     print "\n $key";
141                                     foreach $j (@$value) {print " $j"; }
142                                     }
143                          }
144             print "\n } # End PointLight";
145 }
146
146 #-------------------------------------------------------------------
147 # For doing your own diffuseColor node.
148 #-------------------------------------------------------------------
149
150 sub diffuseColor {
151             my ($this,$value) = @_;
152             print "\n diffuseColor";
153             foreach $j (@$value) { print " $j"; }
154             print "\n";
155 }
156
157 #---------------------------------------------------------------------
158 #          Shape node assistant functions begin here.
159 #---------------------------------------------------------------------
160 sub putCube {
161             my ($this,%parm) = @_;
162             VRML::startSeparator;
163             VRML::defineMaterial(@_);
164             VRML::defineTransform(@_);
165             my $cube = VRML::Cube::new(@_);
166             VRML::stopSeparator;
167             return ($cube);
168             }
169
170 sub putCone {
171             my ($this,%parm) = @_;
172             VRML::startSeparator;
173             VRML::defineMaterial(@_);
174             VRML::defineTransform(@_);
175             my $cone = VRML::Cone::new(@_);
176             VRML::stopSeparator;
177             return ($cone);
178             }
179
180 sub putCylinder {
181             my ($this,%parm) = @_;
182             VRML::startSeparator;
183             VRML::defineMaterial(@_);
184             VRML::defineTransform(@_);
185             my $cyl = VRML::Cylinder::new(@_);
186             VRML::stopSeparator;
187             return ($cyl);
188             }
189
190 1;


Listing 21.9. Part of the VRML/Cube.pm file.
 1 package VRML::Cube;
 2
 3 require Exporter;
 4 require VRML;
 5
 6 @ISA = (Exporter, VRML);
 7
 8 @EXPORT = qw(new);
 9
10 sub new {
11         my $type = shift;
12         my $class = ref($type) || $type;
13         my $self = VRML->new;
14         bless $self, $class;
15             my %parm = @_;
16
17             $self->{'width'} = $parm{'width'};
18             $self->{'height'} = $parm{'height'};
19             $self->{'depth'} = $parm{'depth'};
20
21             printf "\n Cube {";
22             print "\n width $self->{'width'} " if $self->{'width'};
23             print "\n height $self->{'height'} " if $self->{'height'};
24             print "\n depth $self->{'depth'} " if $self->{'depth'};
25             printf "\n } \n";
26
27         return $self;
28 }
29 1;

Summary

This chapter has introduced you to VRML and a Perl package that helps you create VRML files. Using the powerful features of Perl, you can generate VRML output in an object-oriented fashion. The use of the VRML.pm module is justified when you want to display the results of a calculation in three dimensions. Several VRML editors on UNIX and Windows are available on the Internet that allow you to create and view complex models.


Previous chapter Chapter contents Contents Next chapter


With any suggestions or questions please feel free to contact us