
Copyright ©1996, Que Corporation. All rights reserved. No part of this book may be used or reproduced in any form or by any means, or stored in a database or retrieval system without prior written permission of the publisher except in the case of brief quotations embodied in critical articles and reviews. Making copies of any part of this book for any purpose other than your own personal use is a violation of United States copyright laws. For information, address Que Corporation, 201 West 103rd Street, Indianapolis, IN 46290 or at support@mcp .com.
Having an FTP server is an excellent way to make information available to people, regardless of what kind of Internet software they're using. You can also use it to allow people to upload files to your system, either anonymously or through an account with a password. So, whether you want to make information on your company's services available, or allow the people with whom you're working on an important project to upload their work to your system so you can take a look at it, setting up your FTP server is worth the time and effort.
In this chapter, you learn:
Slackware comes with an FTP server that you can install automatically, but I've chosen a more feature-rich server for you to install. If you would rather use the simple FTP server that comes with Slackware for now, you can access the man pages for it by typing man tftpd. However, this is a very basic server. Installing the one included in this chapter will give you better site security. It will also give you more features, since the FTP server installed in this chapter supports a number of nonstandard FTP services, including the capability to:
The FTP server you're going to use is wu-ftpd-2.4, from Washington University (the site of WUArchive). The features it has to offer in addition to the standard FTP protocols make it a worthwhile addition to your site's servers.
To locate and uncompress wuftpd:
Before compiling your FTP server, you need to look at the file that defines where wuftpd's configuration and data files go. To do this, you will edit the file pathnames.h (located in the directory where you have stored your wuftpd files in the src subdirectory) and determine whether the defaults set there fit your needs. If they don't, change them to where you want the files listed to be stored.
You can either choose to have the various configuration files used for wuftpd in various locations, or within one directory. I generally prefer to keep the configuration files for an individual program all in one place. This makes my life easier when I try to locate problems with the server, or make configuration changes later.
Other sysadmins have other ways of handling such configuration files, of course. If you have another structure in mind, or prefer to go with the defaults given, go ahead and use it. There is no one true way to structure your files.
For example, perhaps you prefer to keep all path configuration files for the programs you compile together in one directory. Or maybe you prefer to keep your program configuration files together, but grouped according to program type (e.g., all server configuration files in a single directory, all configuration files for programs for the sysadmin in one place, and so on).
To change a statement to what you want for your own system, just change the path within the quotes. The various path statements stand for:
To compile wuftpd, do the following:
If you aren't sure the compilation finished correctly, and want to make sure that you didn't miss any error messages, use the following syntax when telling it to compile:
build lnx > blort 2>&1
The first > redirects the output from the command build lnx to the file blort. The second instance, using 2>&1 tells your system to send any error messages to the file blort as well. Therefore, when you're done compiling, you'll have a file containing all the messages the compiler gave, both standard and error.
You won't see any of the compiler messages on your screen because of this. The redirecting tells your system to send them to the file blort instead of to your screen.
If the compile ends before it should, listing as its problems strunames, typenames, modenames or other such items being undefined, go to the directory /usr/include/arpa and make a backup of the file ftp.h. Then, go back to the directory in which you have your FTP files for compilation, change to the support directory, and copy the file ftp.h from there to /usr/include/arpa. That should fix the problem.
If the compiler ends before it should listing problems ith pid_t, go to the directory in which you have your FTP files for compilation, go to the src directory, and edit the config.h file. Add the line:
Installing your FTP server will take a while because you need to make sure there are no tricky little security holes! So, just take your time and follow along carefully.
To complete the basic wuftpd installation, do the following:
Often, you would use a soft link to handle this instead of copying the program. However, when wuftpd starts up, it changes its definition of "root directory" to ~ftp. Once it does this, it can't see outside of ~ftp, and so a soft link pointing to /bin/compress would be pointing to somewhere that wouldn't exist to wuftpd. Wuftpd would try to find it in ~ftp/bin/compress, which is where you're putting it, not where it's coming from.
Now, you're going to set up some necessary directories and files, according to smart security precautions. To accomplish this, do the following:
Some additional simple things you can do to ensure that no one can take advantage of the user ftp existing on your system are the following:

If you want to create an empty file, you can use the command touch.
There are a few files you need to create now for server security. The examples shown in this section can be found by going to the directory where you stored your pre-compilation FTP server files, and then changing to the doc/examples directory.
You might not need to change the ftpconversions file, as its purpose is to handle file compression and uncompression. The contents are as follows:
:.Z: :  :/bin/compress -d -c %s:T_REG|T_ASCII:O_UNCOMPRESS:UNCOMPRESS
 :   : :.Z:/bin/compress -c %s:T_REG:O_COMPRESS:COMPRESS
 :.gz: :  :/bin/gzip -cd %s:T_REG|T_ASCII:O_UNCOMPRESS:GUNZIP
 :   : :.gz:/bin/gzip -9 -c %s:T_REG:O_COMPRESS:GZIP
 :   : :.tar:/bin/tar -c -f - %s:T_REG|T_DIR:O_TAR:TAR
 :   : :.tar.Z:/bin/tar -c -Z -f - %s:T_REG|T_DIR:O_COMPRESS|O_TAR:TAR+COMPRESS
 :   : :.tar.gz:/bin/tar -c -z -f - %s:T_REG|T_DIR:O_COMPRESS|O_TAR:TAR+GZIP
If the paths above are not correct, you need to change them to the appropriate value.
Now, copy this file to the location you assigned in pathnames.h.
First, take a look at the example file for ftpusers:
root
bin
boot
daemon
digital
field
gateway
guest
nobody
operator
ris
sccs
sys
uucp
These are usernames that cannot log into your FTP server. You can remove or add to this list as you wish, but keep in mind that the defaults were chosen because of the possible security holes they cause.
When finished with this file, copy it to the location you assigned in pathnames.h.
The ftpgroups file is meant to allow you to create a group of predefined people who are allowed to FTP into your system. The contents of the example of the ftpgroups file is as follows:
test:ENCRYPTED PASSWORD HERE:archive
The items in the example above stand for:
One way to create this password is to create a dummy user, give that user a password, and then copy that password straight from /etc/passwd to where you need it. Then, just delete the dummy user.
For a user to take advantage of this feature, he would log in to your FTP server through the standard anon procedure. Then, he would execute the commands SITE GROUP and SITE GPASS to gain the additional group privileges assigned to the /etc/group item to which he assigned himself.
Once you finish editing this file (if you want to use it at all; I didn't), copy it to the directory to which it's assigned in your pathnames.h file.
If you want some control over where various users can FTP in from (allowing and disallowing certain hosts), you can use the ftphosts file to allow or deny access. This is useful if you only want people to be able to FTP in from particular locations, or if you find someone is using your site in a way you want to prevent from particular locations (e.g., uploading files you don't allow, such as copyrighted material). The contents of the ftphosts file are:
# Example host access file
#
# Everything after a '#' is treated as comment,
# empty lines are ignored

    allow   bartm   somehost.domain
    deny    fred    otherhost.domain 131.211.32.*
Note that the syntax is in three columns:

If you use allows, only people coming from the hosts you explicitly listed can FTP in as the specified username.
If you want to allow anonymous users to run executables on your FTP server, put these programs into the directory assigned in pathnames.h.
Be extra careful what you put in this directory; you do not want to create a security hole for yourself!
There are just a few more things you need to do to install your FTP server:
Starting your FTP server now is easy! Just do the following:
After all of this work, it will feel good to be able to use your FTP server! Let's put a file into your FTP site to look at, install a better FTP client, and test the server to make sure it works.
If you want to know what people will see when they log in to your FTP server, take a look in the directory ~ftp. This is the directory in which they start. From there, you can structure your server's filesystem as you wish. As a general rule, the ~ftp/pub directory you already created is where the files you want to make available to the public are placed.
Another standard is the ~ftp/incoming directory, from which people can upload materials to your site. If you do create this directory, be sure the permissions are set so that people can write to it!
Only create an incoming directory if you're certain you want to allow people to FTP materials onto your site. You may find that you have problems with people using this directory to upload any number of illegal items so their friends can pick them up before you see and remove them, such as pirated software and child pornography.
If you do use an incoming directory, be sure to check it on a regular basis and look over the files it contains beyond just looking at the file name.
If you are seriously concerned with determining what kinds of files are illegal, etc., you'll need to contact a local lawyer. You can also contact the EFF (Electronic Freedom Foundation). The URL for their home pages is given in chapter 9, "Installing UseNet Server Software."
Also, check all MS-DOS and Macintosh System files that appear in your incoming directory for viruses, especially if you're not sure who uploaded them!
If you have any files you want to make available, go ahead and start arranging them in your FTP server! Be sure that the permissions on your directories and files are as you want them.
Even though you already have an FTP client, another alternative is NcFTP. This is a more flexible and "fancy" client that allows you to do extra things, such as view files without downloading them and resumes file transfers that died for one reason or another.
The FTP client you're going to install here is ncftp-2.1.0.
To locate and uncompress NcFTP:
NcFTP is set up to configure fairly painlessly. To install this client, do the following:
If you would rather be able to type ftp instead of ncftp, you can create a symbolic link to redirect it (you can also use an alias, but you would have to set this alias on every computer). Change to /usr/local/bin, which is the directory to which ncftp was installed. Now, type ln -sf ncftp ftp (keep in mind that if you have an ftp file in this directory, it will be overwritten; so if you want to err on the side of caution, you might want to move it to ftp.old).
Now, type which ftp to see which program will be run if you type ftp. If it is not the one in /usr/local/bin, you need to edit the path in your /etc/profile or /etc/login file so /usr/local/bin comes before /usr/bin. If you have to do this, type which ftp again afterwards to ensure that you are now using the proper FTP client.
Now let's see if everything works! There are a number of access avenues and features that need to be tested.
Test both the ability to FTP in anonymously, and FTP into a user account.
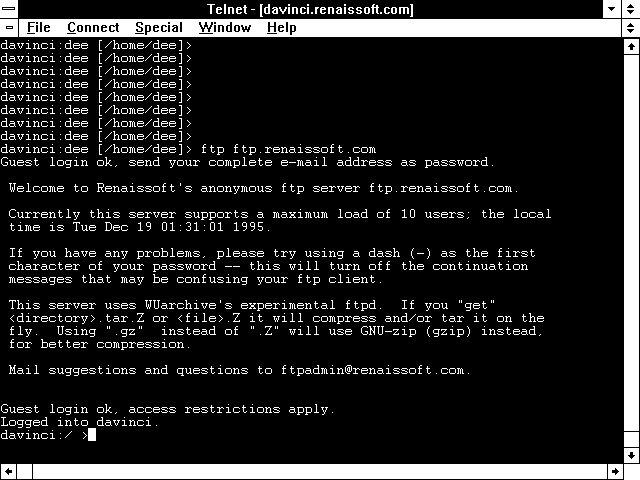
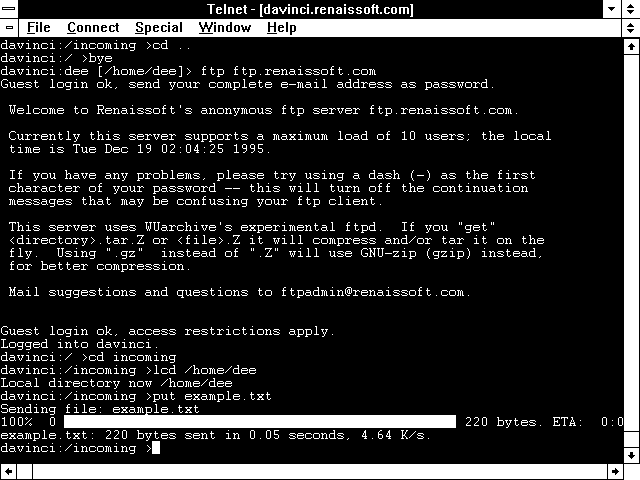
For example, I'll FTP anonymously into ftp.renaissoft.com. From my personal account, I'll just type ftp ftp.renaissoft.com. NcFTP is smart enough to figure out your e-mail address for itself, so you don't have to type it in as your anon password. Then, I get the welcome message to the machine and am given a prompt (see fig. 10.1).
Fig. 10.1 FTPing anonymously into ftp.renaissoft.com.
A handy feature of NcFTP is that it remembers site names. Next time I wanted to go to ftp.renaissoft.com anonymously, I could just type ftp renaissoft.
As you noticed, you didn't even have to type in anonymous as a userid. This is because NcFTP assumes you want to do an anon FTP by default. I'll do another example here of a non-anonymous FTP. This time, I want to go to the same machine, but to my own account. I'll type ftp -u ftp.renaissoft.com. Then, I'll enter my userid at the prompt (dee), and my password at the password prompt. From there, I go straight to a prompt in my own home directory (see fig. 10.2).
Fig. 10.2 FTPing into a machine as a non-anonymous user.
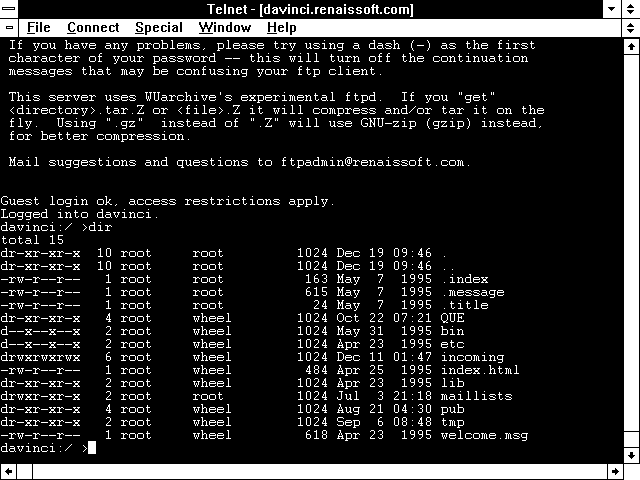
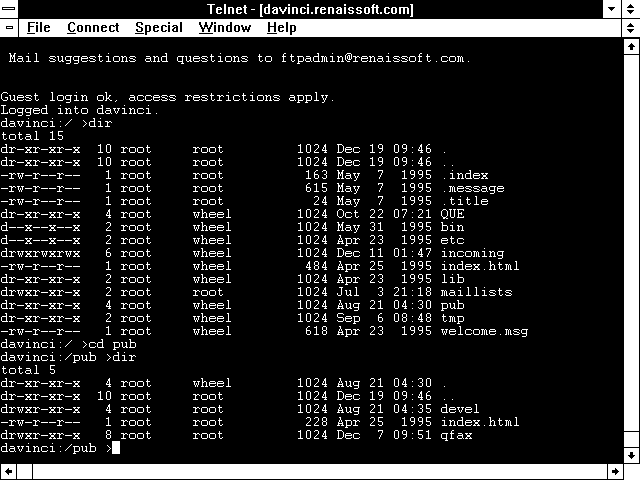
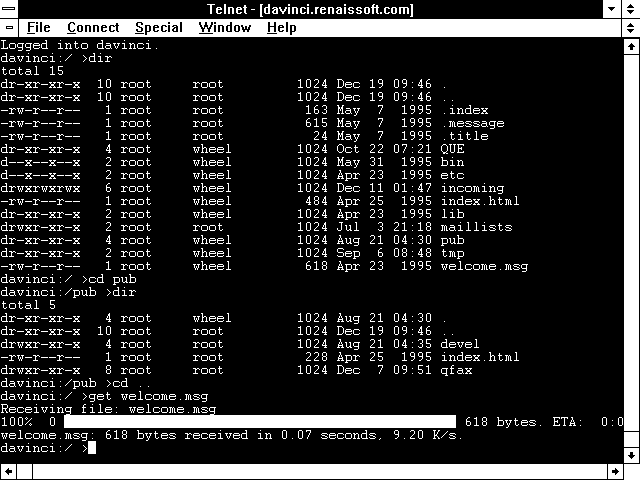
Test the following directory and file access concerns:
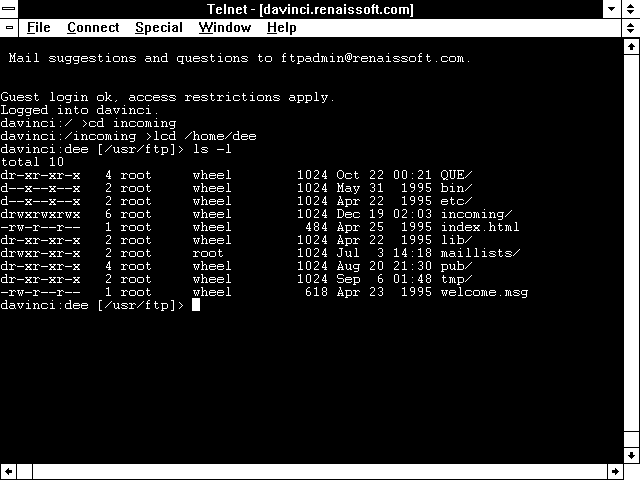
Fig. 10.3 Getting a directory listing in an FTP server
Fig. 10.4 Changing into a directory on an FTP server, and looking to see what's there.
Fig. 10.5 Getting a file from an FTP server.
With some servers, if you want to get a number of files, you can use the command mget. For example, if you wanted to get file1 and file2, you could type mget file1 file2. However, this command doesn't work with all servers.
NcFTP remembers the directory you were in the last time you left a particular server and takes you back to it when you return.
Fig. 10.6 Putting a file into /incoming on an FTP site.
Just as some servers support mget, some also support mput for putting multiple files.
Fig. 10.7 The difference between the permissions for an /incoming directory and any other FTP directory
If you have problems with one or more of these items, check the permissions and ownerships carefully.
If you used any of the special items from the pathnames.h file, such as user groups, test these as well. If you're having problems with these and cannot figure them out, keep in mind that because you installed the server, you have access to the manual pages.
There is an X-Windows FTP client called xftp. You can find it through a Web search using Netscape. It should be available at sunsite.unc.edu and its mirrors.
For technical support for our books and software contact support@mcp.com
Copyright ©1996, Que Corporation