
Copyright ©1996, Que Corporation. All rights reserved. No part of this book may be used or reproduced in any form or by any means, or stored in a database or retrieval system without prior written permission of the publisher except in the case of brief quotations embodied in critical articles and reviews. Making copies of any part of this book for any purpose other than your own personal use is a violation of United States copyright laws. For information, address Que Corporation, 201 West 103rd Street, Indianapolis, IN 46290 or at support@mcp .com.
Now that you've got the right equipment, the appropriate connection type, and a service provider to feed your site's data to the Internet, let's get down to business. The most important part of installing Linux, believe it or not, is preparation. Installing the operating system (which you'll do in Chapter 7, "Installing Web Server Software") is the easy part and is fairly well-automated nowadays. First, however, you have to get set up properly.
In this chapter, you'll learn:
There are a few things you need to do before you continue. Make sure to carefully go through this section if you want your Linux installation to go smoothly!
Have the following ready to use before you go any farther:
It may seem that you cannot install from your CD-ROM drive if you don't have the operating system installed, because you don't have the drivers. However, when you select your boot disk later in this chapter, you will select the disk containing the appropriate drivers.
The CD-ROM comes with a full set of Linux Slackware distribution disks on it. Slackware is one way (and the most popular as yet) Linux is distributed, a nice neat package containing everything you need to install and set up the operating system. It is Slackware, for example, which has divided Linux up intro the distribution disks we discuss a bit later in this chapter. Otherwise, Linux would just come as a jumble of files and some instructions.
If you're going to install from the CD-ROM, then you need not worry about which disks you'll need at the moment. However, if you're going to copy the CD-ROM to floppies to install Linux, you can save yourself some extra work by deciding which disks you'll need. Remember, you'll need one floppy disk for each distribution disk.
The Slackware distribution included on the CD-ROM contains the necessary distribution disks for a full Linux installation. To help you determine which disk sets you might not need, here's a full list of what each set contains (the a series is not included here, since you have to install this one):
Set     Contents
ap:     ash, bc, diff, ftape, ghostscript, gonzo, groff, ghostscript fonts, ispell, ispell, jed, joe, jove, jpeg, manpages, mc, mt_st, quota, sc, sudo, termbin, termnet, termsrc, texinfo, vim, workbone, zsh
d:      binutils, bison, byacc, clisp, f2c, flex, gcc, gcl, gdb, gmake, libaout, libc, libgxx, m4, man2, man3, ncurses, p2c, perl, pmake, rcs, strace, svgalib, terminfo, tools
e:      emacs
f:      FAQ and HOWTO files
k:      lx1213, lx1320n: bind, cnews, deliver, dip, elm, inn, mailx, netcfg, nn, pine, ppp, rdist, sendmail, smailcfg, tcpip, tin, trn, uucp
q:      aaztcd, abare, acdu31a, acdu535, acm206, agscd, aidecd, amitsumi, aoptcd, asbpcd, ascsi, ascint, aha2940, asjcd, aztech, bare, cdu31a, idenet, cdu545, idecd, mitsumi, sbpcd, scsi, scsinet, xtt: tex
tcl:    tcl
x:      fvwm, rxvt, xwindows, xlock, xman, xpm
xap:    xchess, ghostview, gnuplot, libgr, seyon, workman, x3270, xfig, xfileman, xfm, xfract, xgames, xgrabsc, xpaint, xspread, xv, xxgdb
xd:     xd
xv:     xv (xview)
y:      abuse, bsdgames, doom, sastroid, tetris

If you're not sure which packages you want or are concerned that you may accidentally overlook something you'll need, copy all of the disks. It's better to have too much than not enough!
If you're not going to install X Windows, there's no need to copy any of the disk series' that start with the letter X.
In order to install Linux, you must create two floppy disks: one for the necessary boot information and for the necessary root information. After installing Linux, keep these disks handy for system emergencies that you may run into later.
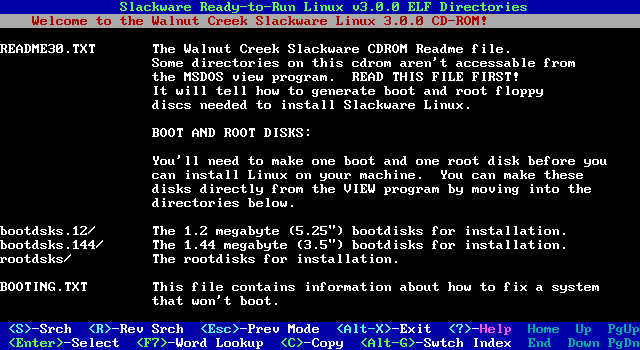
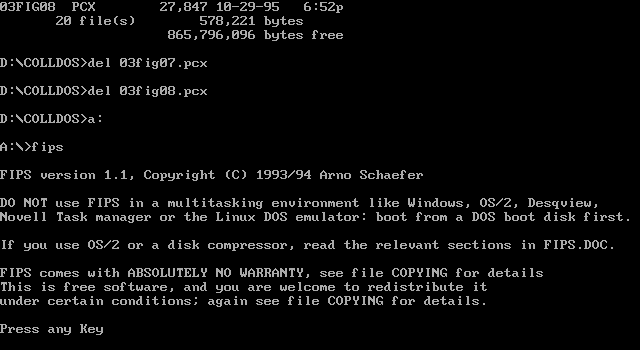
Creating your boot disk is a simple but important step in the Linux installation process. You will use an MS-DOS program provided on the CD-ROM, called view, to create it. Now, take one of your 3.5'' or 5.25'' and place it in the a: (or appropriate) drive. Then, from MS-DOS change to your CD-ROM (I will assume d:, but use the appropriate drive letter). Now, type view (see figure 3.1 for what you will see at this point).
Fig. 3.1 The initial screen for view from the CD-ROM.
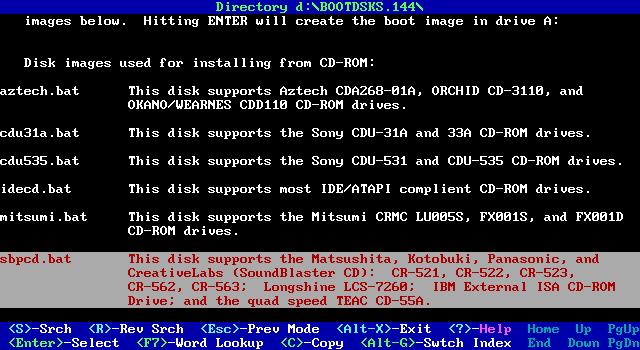
Depending on whether you're using 3.5'' disks (1.44) or 5.25'' disks (1.2), choose the appropriate directory from bootdsks144 and bootdsks12 by moving to it with the cursor keys and pressing Enter (see figure 3.2).
Fig. 3.2 Selecting the bootdsks144 directory in view.
You now need to select the appropriate boot disk for your needs. The boot disk is especially important because it contains the drivers that will allow you to install from your CD-ROM. Table 3.1 lists the types of boot kernels available with this Linux distribution for 3.5'' drives. (If you're using a 5.25'' drive, look in the file d: \bootdsks122\readme for information on the files available.) You'll quickly see that you need to know what kind of hardware is in your computer system to choose which boot disk to use.Table 3.1 Linux Boot Kernels for 3.5'' Floppies
File Name       Hardware
aztcd.gz        IDE, SCSI, and Azetch/Okano/Orchid/Wearnes hard drives, non-IDE CD support.
bare.gz Only IDE hard drive drivers.
cdu31a.gz       IDE and SCSI hard drives, and Sony CDU31/33a CD.
cdu535.gz       IDE and SCSI hard drives, and Sony CDU531/535 CD.
mitsumi.gz      IDE and SCSI hard drives, plus Mitsumi CD.***
idecd.gz        IDE and SCSI hard drives, plus IDE/ATAPI CD-ROM.***
net.gz  IDE hard drive and Ethernet.
sbpcd.gz        IDE and SCSI hard drive, plus SB Pro/Panasonic CD and TEAC-55A CD.
scsi.gz IDE hard drive, plus SCSI CD-ROM.
scsinet1.gz     IDE and SCSI hard drive, SCSI CD-ROM, and Ethernet.*
scsinet2.gz     IDE and SCSI hard drive, SCSI CD-ROM, and Ethernet.**
xt.gz   IDE and XT hard drive.
* scsinet1.gz supports the following SCSI cards: Adaptec 152x/1542/1740/274x/284x, Buslogic, EATA-DMA (DPT/NEC/AT&T), Seagate ST-02, Future Domain TMC-8xx, 16xx.
** scsinet2.gz supports the following SCSI cards: Generic NCR5380, NCR 53c7,8xx, Always IN2000, Pro Audio Spectrum 16, Qlogic, Trantor T128/T128F/T228, Ultrastor, 7000 FASST.
*** mitsumi.gz is not for the Mitsumi triple and quad-speed IDE/ATAPI drives. If you have one of these drives, you will want to use the idecd.gz disk.
There are two boot disks for each type of CD-ROM. If the one you choose doesn't work, try the other one.
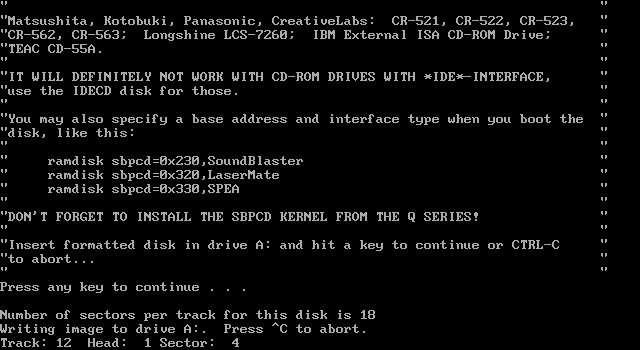
If you're still unsure of which boot image to use, take a look at d: \bootdsks144\which one on the CD-ROM (or bootdsks122 if you're using a 5.25 boot floppy). Once you've decide on the boot kernel appropriate for you, make sure you have put your boot disk in the floppy drive, then move the cursor to the kernel batch file that you want (e.g. sbpcd.bat, which is the kernel I need, see figure 3.3) and press Enter.
Fig. 3.3 Selecting the boot kernel, in this case sbpcd.bat
You are prompted to press Enter once again (see figure 3.4), and then view copies the kernel to the disk. Then, just remove your new boot disk from the drive and label it so you'll recognize it later easily (e.g. Initial Boot Disk). Keep it handy; you'll need it during the installation.
Fig. 3.4 View prompts you to press Enter again, and then writes the kernel to the disk sector by sector.
At this point, you can either exit the view program by pressing Alt+X, or back up to the main CD-ROM directory by pressing Alt+G.

Make sure to label your boot disk clearly. Also, after you've used it for the installation process, put it somewhere safe. You may want to get a special disk box just for Linux items and keep the boot disk right up front. You'll need it if you ever have problems with your Linux system!
Creating your root disk is also both simple and important. Once again, we'll use the MS-DOS view program, which is in the root directory of the CD-ROM. Put an empty, formatted disk (the same size as your boot disk) into the floppy drive, change directories to the CD-ROM, then type view if you exited the program earlier.
Remember, you must use the same size disk for both boot and root! When you're booting into Linux, the computer will look in the same drive for both disks.
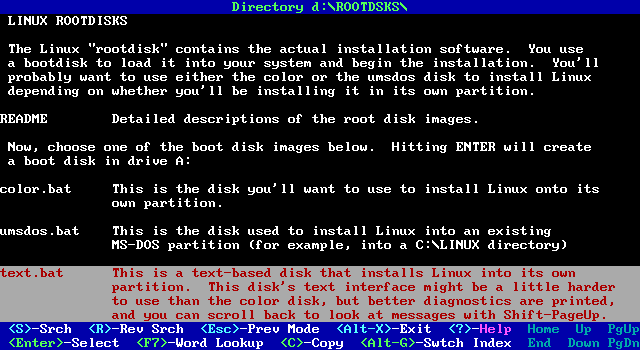
Change to the rootdsks directory (see figure 3.5).
Fig. 3.5 The rootdsks directory on the CD-ROM.
Now, you need to determine which root image is appropriate for your needs, as you did with the boot disk. Table 3.2 lists the types of root images available with this Linux distribution. In the case of the root images, the files themselves are the same regardless of disk size, so you don't have to look in a separate place for each floppy disk size.Table 3.2 Linux Root Kernels
File Name       Method of Installation
color.gz        Root install disk for 1.44M floppy drives. Uses a new full-screen color install program. IMPORTANT NOTE: Although nice to look at, this install program has a few bugs and is not recommended until it's cleaned up. For example, it's not forgiving of extra keystrokes.
umsdos.gz       A version of color144.gz that uses UMSDOS. Allows you to install Linux into a directory or an existing MS-DOS partition. Not the fastest possible choice, but it works and won't require you to repartition your hard drive (discussed later in this chapter). For more information on this option, see the file d:\slakware\root144\readme.uns.
text.gz Root install disk for 1.44M floppy drives. Contains new versions of tty-based install scripts from previous Slackware releases of Linux. All new keymaps should be supported. Also gives more detailed error messages than color.gz during installation, so I use this one in my examples.
tape.gz Installation from tape (semi-experimental). For more information on this option, see the file d:\slakware\root144\readme_t.ape.
pcmcia.gz       Identical to the text.gz root disk, but used for installing via NFS to a laptop with a PCMCIA ethernet card.
If you would like to try the color installation program, you're welcome to. It works most of the time. You can even make two different root disks at this point, one for color and one for text, so if you find the color installation too difficult or that it doesn't work you can just erase what it installed and start over with the text install.
Regardless of the root disk you pick, the thought behind the choices you'll make will be the same, so the example will still help.
From this point, follow the same procedure for creating the root disk as you did for the boot disk. Just use the cursor to select which root image you want, then press enter. You will be asked to press Enter again as with the boot disk, and then it will copy the root disk sector by sector. Once it's installed, label the disk clearly and put it in a safe place with the boot disk.
Label your root disk clearly. After you've used it for the installation process, put it away for safe keeping (preferably with your boot disk). If you have system problems later, you'll need both the boot and root disks to recover your site!
Be sure that your computer's BIOS is set up to check for floppy disks at boot time! If you configured it to ignore disks in the floppy drives, you will not be able to use your boot and root disks.
The next step in the Linux installation process is partitioning your hard drive. Even if you plan to have only Linux on the drive, and not MS-DOS at all, you must partition your drive to create swap space. However, if you are using multiple hard drives in one machine that is used for Linux only, you don't need a swap partition on each drive. Only one swap space per Linux system is necessary.
A swap partition is Linux's version of virtual memory. The less RAM you have in a computer, the more important the size of your swap partition is, as it serves as RAM.
From this point, you no longer need MS-DOS capability unless you need to try another boot or root disk option. So, if you have MS-DOS on your drive, but don't intend to use it, feel free to pretend that the drive is blank. For your piece of mind, however, you may want to make sure you have access to an MS-DOS system somewhere-just in case.
If you're installing Linux on a drive that you use for other work and have files you'd really like to keep, be sure to back them up! Repartitioning a hard drive can destroy data if something goes wrong. Back up everything you don't want to lose.
In Chapter 2, "What Kind of Hardware and Connection You'll Need," I discussed various things that effect hard drive requirements. I seriously recommend that you get at least a 200M drive (not much of a worry since 200M is on the low price end of hard drives today) if you want to do anything with your site other than look at it. And the more space you have the better. As I know you've discovered, no matter how much hard drive space you have, you can find a way to fill it all.
Be sure to look at the physical hard drive space, and not compressed hard drive space. If you have your hard drive compressed (e.g. by Microsoft's DriveSpace), it looks to your computer like the data in that compressed drive is in one huge file. If you partition that drive, you will lose your data because the file will be broken in pieces.
If you're going to use only Linux on a machine, deciding partition sizes is fairly easy. You'll only need two partitions: main and swap.
I recommend that you make the total available memory at least 16M (your RAM plus your virtual memory should total 16M). Of course, even if you have a lot of memory on your machine, a server can often use even more. Decide how much space on your hard drive you can spare, and give yourself as much swap space as you can.
The maximum size for a swap partition is 128M. If you want more than that, you can create several swap partitions, but no more than 16.
To find the size of your main partition, just subtract the swap size from the drive size. (For example, if your drive is 540M and your swap partition is 20M, then your main partition is 520M.) If you have to use multiple swap partitions, total their sizes and subtract them from your hard drive space to see how much space you have left for your main partition.
One of the functions of swap space is to handle overflow from your physical RAM, and this can be rather slow. If you find that your applications are consistently going into swap space because they have used up all of your physical RAM, you should consider purchasing more RAM for your server.
If you want to install Linux on a drive that also contains, say, MS-DOS and Microsoft Windows, you'll need to make three partitions: Linux, swap, and MS-DOS.
Keep in mind that if you're going to switch between different operating systems, your machine will not be an Internet site when it's not running Linux. Using multiple operating systems is only recommended for secondary machines if you don't want to have to take your site down on a regular basis.
The size of each partition depends on the size of the hard drive and the following considerations:
If you plan to install Windows 95 after you've installed Linux, be prepared to use your boot and root disks. Windows 95 erases the boot sector (the very first sector) on your hard drive when you install it. You can avoid this problem by using a floppy disk to store the information you might otherwise store on your hard drive's boot sector (discussed in more detail in Chapter 4, "Installing Linux from the CD-ROM").
You will not have this problem in reverse. Win95 doesn't actually use the boot sector of your hard drive, so you don't have to worry about Linux causing you any problems there.
If you've got a drivespaced drive (or it's compressed with another drive compression program), you're going to need to undrivespace it before you partition the drive. If the drive is almost full, you'll have to remove enough information to free space for decompressing the drive. If you have a tape backup, this would be a good time to backup your drive and then just get the items you want off the tape when you're finished. No matter how you decide to do this, back up your most important files!
You could also zip up the important files and copy them to disk if you don't have a tape drive. This will take you much less time than copying the files to disk without zipping them first.
Use the following method to determine the actual size of each partition that you want to create:
For example, let's say I've got a 540M drive and 8M of RAM, and I want both Linux and MS-DOS partitions on it. Following the process described above, my answers would be as follows:
You may find that you want to be able to move files between your MS-DOS and Linux partitions. While the server for my site is always in Linux, I switch my computer between Linux and DOS depending on what kind of work I have to do. If I want to take a word processing file and e-mail it to someone, I can't just copy it over from the Linux partition if I compressed my drive.
If you want to compress your MS-DOS partition, but still want to be able to transfer files between it and the Linux partition, you can create a small MS-DOS partition and not drivespace it. The small partition would be accessible by both MS-DOS and Linux. Don't make it too small, though. Remember, you have to be able to fit the files you want to transfer into the partition.
If you're installing Linux on multiple machines that will be connected by Ethernet, and you're installing multiple operating systems on the second machine but not on the actual Internet server, you can set your network up so that you can use the Linux Internet connection from your MS-DOS partition. Thus, you can transfer your data between your MS-DOS partition and your Internet site via FTP instead of using an extra MS-DOS partition. There's more on this subject in Chapter 5, "Setting Your Site up for General Use."
In this case, the computer I'm setting up is my only one. I'll make a 10M MS-DOS partition, without compression, so I can transfer files around. That leaves me with 58M. I'll increase my swap partition from 22M to 30, my Linux partition from 300 to 340, and my MS-DOS partition from 150 to 170. That uses up the rest of my space.
If you're going to have MS-DOS and Linux both on the same hard drive, then what you will do next depends on whether your hard drive is already partitioned and how much of it is drivespaced.
If you're not going to have multiple operating systems on this drive, and it's already just one big partition that you intend to wipe clean, then skip to the next step in the installation process.
If you've got just one partition, MS-DOS, the first thing you need to do is clear it so that it fits, without compression, into the MS-DOS partition you're going to have. Then, run the DEFRAG program on your drive to make sure all of your data is together at the beginning of it. Once you've got your MS-DOS files all within the beginning of the hard drive, taking up less space than you plan for your MS-DOS partition, you're ready to continue.
There are methods of partitioning your hard drive that destroy your data. The one we use in this chapter doesn't destroy data, but just in case, you may want to back up your important files.
Before you partition your hard drive into one MS-DOS partition and one Linux partition, you need to do the following:
If you need special drivers, be sure to copy these to your bootable floppy! Especially if you're working with large hard drives. The best test is to make sure to reboot with the floppy disk and see if you can access the drive you want to partition. If you can't, be sure you have the drivers you need, and be sure to create a config.sys file on the floppy to load them. Each time, if you're not sure what to do, reboot with the floppy and see what you have access to and what you don't. Your config.sys file on your hard drive should be a good help in figuring out how to phrase the lines you need.
Now, it's time to repartition your drive! Do the following:
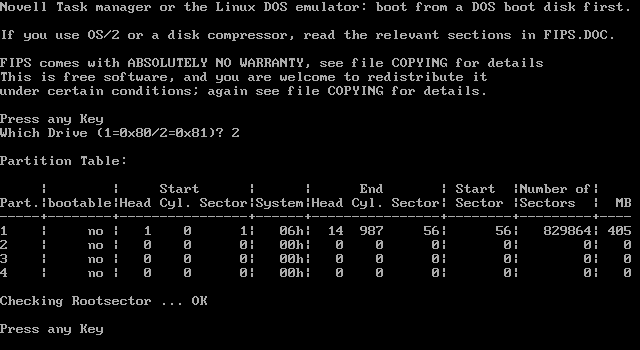
Fig. 3.6 Fips, the program you will use to repartition your drive.
Fig. 3.7 Fips displays the initial partitions on your drive.
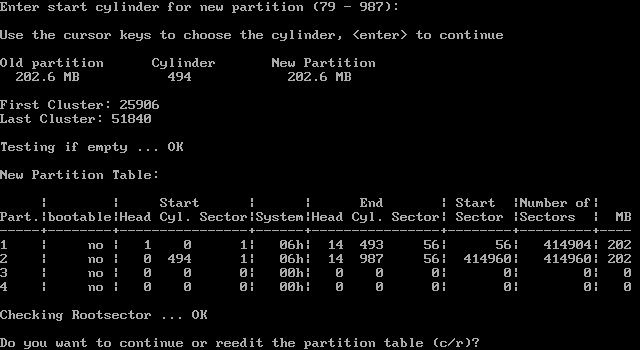
Fig. 3.8 Here is what fips set my partitions to once I gave it the sizes I wanted to use.
If you're starting out with only one compressed MS-DOS partition on your drive, the first thing you need to do is decompress your drive. This can be a painful process if your drive is large and almost full, but you have to do it. Take the time to clear things out of the drivespaced drive (backup to disk, delete things you don't need or can reinstall) so you can decompress it in the room you've got. Once you've done this, follow the instructions in the previous section for non-drivespaced drive partitioning.
Before you can install Linux on the new partition, you need to prepare that partition for the operating system. All of this fiddling with the hard drive may be a bit tedious, but remember, each step brings you closer to setting up your Internet site.
It's time to boot your computer with Linux! Find the Linux boot disk you made at the beginning of the chapter, and put it in the floppy drive. Reboot and do the following:
Now you're going to use Linux's fdisk program to finish with your drive partitions. Look below for the device names assigned to various hard drives.
Name      Drive

/dev/hda  First IDE Drive
/dev/hdb  Second IDE Drive
/dev/sda  First SCSI Drive
/dev/sdb  Second SCSI Drive
Choose the appropriate device name, and then run fdisk using that device name, for example, fdisk /dev/hda.
To see the fdisk menu options, type m at the prompt.
Type p to look at your current partition table. If you don't want any MS-DOS partitions left (or if you have extras you want to delete), type d to delete a partition. Then, enter the number of the partition you want to delete, and press Enter.
Now, type n to define a new partition and p to make that a primary partition (one of the four partitions you were looking at using the fips program). Enter partition number 2 if you kept a DOS partition and the Linux partition is the second one on the drive. (If you don't have an MS-DOS partition, you'd enter 1.) To keep from having to do a lot of math and count cylinders, I recommend you make your swap partition at the very beginning of the Linux partition. Therefore, enter the first cylinder number listed on your screen. Then, instead of having to calculate a last cylinder number, enter the size in megabytes of your swap partition, such as +30M.
If you get the message, Warning: Linux cannot currently use XXXXX sectors of this partition, ignore it. It's no longer valid for today's versions of Linux.
Adjust the partition numbers if you don't have an MS-DOS partition. Basically, just subtract one from every partition number that I say to type in.
Now, type t to see a partition type, and enter the partition number you want to define. If your MS-DOS partition is one, your swap partition is two, and your Linux partition is three, then you'd first enter 2 for your swap partition. When it gives you the hex code, make sure it says 83 for a swap partition.
Now, you'll define your main partition. Follow essentially the same steps as before:
Just to double-check everything, type p to get a listing of the partitions on your hard drive. One should be listed as Linux swap, one as Linux native, and one as DOS if you've got a DOS partition. Now, write down the table on your screen. You'll need this information!
If everything looks okay, type w for write and quit. If something's wrong, go back and follow the instructions again, then exit as mentioned before.
Now, you have to format your swap partition. Type mkswap -c <partition name> <size of partition in blocks> (you'll get the partition name and size from the table you just wrote down).
Partition name refers to the Device field of the table you copied down in the previous section (e.g., /dev/hda2). Size of partition refers to the size of the partition in blocks from the same table.
Once the swap partition is formatted, type swapon <name of partition>.
Finally, all you really have to do is create the file system or format the drive. Type mke2fs <name of partition> <size of partition in blocks>. This time, the partition I'm referring to is your Linux partition itself-number three in my example above (the name of this partition would then be /dev/hda3).
I left out the -c option this time because it checks the drive for bad blocks and can take overnight on large drives. If you still want to use the -c option, you certainly may.
Be sure to type synch before shutting your system off if you're going to shut it off between steps. This will make sure you don't lose any information that hasn't been stored to disk yet.
And now, you're all set to install Linux-yet one more step closer to setting up your Internet site!
For technical support for our books and software contact support@mcp.com
Copyright ©1996, Que Corporation